
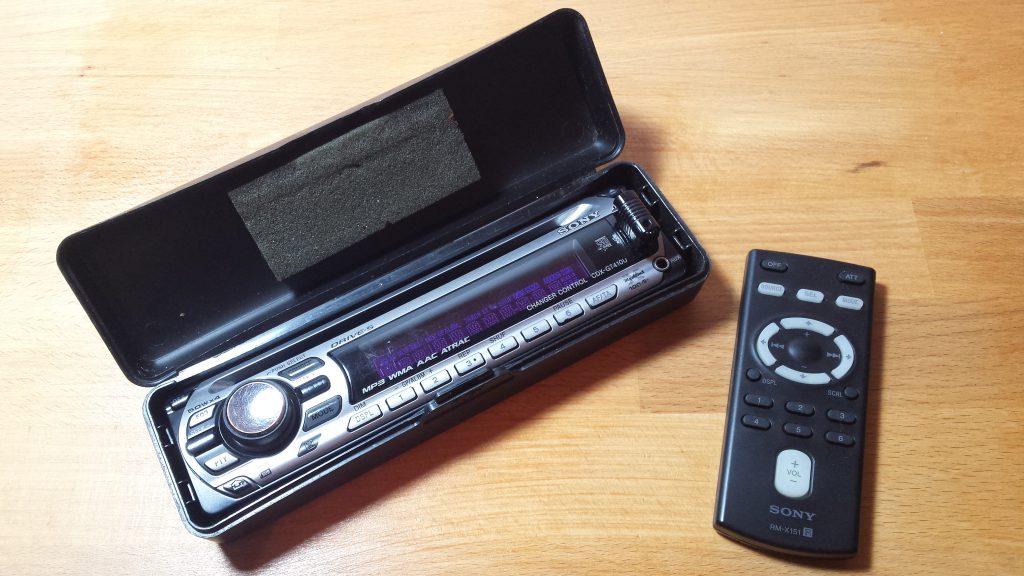
After assembling the hardware on a breadboard, I started experimenting with the code. I also got the remote handy, remember in a previous posting I talked that the head unit came with a small remote. Just as a reminder the head unit is a CDX-GT410U and the remote is model RM-X151.
First thing is to figure out is how I want everything to run. Figuring out how exactly my buttons are going to control everything. Don’t forget the buttons are a factory part and I am keeping them that way so I have a total of 6 buttons to play with. Looking on the IR remote I got with the unit there’s a whole lot more than 6 button so this will take some thinking. The 6 buttons are “>”, ”<”, ”|” – left side from top to bottom and “+”, ”-“, ”o” – right side from top to bottom. As reference here is an eBay listing of this model of steering wheel: https://www.ebay.com/itm/Vauxhall-Astra-G-Zafira-A-GSi-Leather-Steering-Wheel-/263327696233 . (mine is still in bits).
So, if I want these buttons to control the stereo in a way somewhat reminiscent of how they were designed to (and how they have the legend printed on them) the buttons would each control one function like this:
| Button | Function |
| > | Next |
| < | Previous |
| | | ? |
| + | Volume + |
| – | Volume – |
| o | Change input |
Because the head unit has way more controls than I have buttons for. This made me want each input to have 2 modes: a short press and a long press. This doubles my possible commands from 6 to 12 as follows
| Button | Short press function | Long press function |
| > | Next | 1 key (seek forwards / next album) |
| < | Previous | 2 key (seek backwards / previous album) |
| | | ? | 5 key |
| + | Volume + | 3 key (repeat) |
| – | Volume – | 4 key (loop) |
| o | Change input | 6key (pause) |
Great now we are getting there. Key 1 and 2 mean so many different things because the functions are contextual (if you are listening to radio vs reading a USB stick). Oh, and I left one slot empty, that is because I am planning on having a special combination that can also lock and unlock the doors. The only way I can lock and unlock doors at the moment is by pressing the knob on the door that is right besides my shoulder or using the remote on the key. The first option is uncomfortable and the second nearly impossible while driving. So, the final key functions look like this:
| Button | Short press function | Long press function | SuperShift function |
| > | Next | 1 key (seek forwards / next album) | |
| < | Previous | 2 key (seek backwards / previous album) | |
| | | Enable SuperShift | 5 key | |
| + | Volume + | 3 key (repeat) | Lock the doors |
| – | Volume – | 4 key (loop) | Unlock the doors |
| o | Change input | 6key (pause) |
The SuperShift functions will enable on a short press of the “|” key and activate on a long press of the “=” and “-“ keys. So, to lock the doors it would be: quick press on the “|” and then hold the “+” until the doors lock. See it’s simpler than it seems (this will bite me later won’t it ? )
This is my final control scheme. I might be making things too complicated to remember but I will figure that out once I’m driving and doing field testing with the unit.
Now as long as we are here let’s discuss how I got the necessary codes you will be seeing me use in the code to send commands to the radio. I simply took the unit’s remote and had an Arduino board configured as a IR recording device. I will get into details on a future posting in witch I will talk about the IR library I am using and IR in general. But all this means in practice is that I pointed the remote to my improvised receiver, pressed a button, saw the code the reader detected and took note of each code for each button in a text file. This little remote came quite handy, thanks Sony for having such an interesting functionality on a car radio!
This coding part is getting to be a long posting so I’m splitting it in 2 parts. In part two of our coding adventures I will discuss the actual code I got to, so see you next time!