Hello again. We talked in the last posts about turning outputs on and off and how that enables the Arduino to interact with the environment by switching loads on and off. So, in this post I will address how exactly that interaction will happen and I hope I will clear up some concepts along the way.
A regular Arduino output pin when it is set to high has a fixed voltage that corresponds to the voltage at which the chip is run. Let’s say we have the chip on a standard Arduino Uno board. This board runs the Atmega 328 microcontroller at 5V. This means that any output that is set HIGH will have a fixed voltage of 5 volts. But that doesn’t mean we can connect say a toy motor to it and have it running. At least not directly. This is because another key characteristic important for a pin is how many amps can pass through it. In the case of a microcontroller that is not much at all, 40mA to be exact. This is enough to turn on a LED (as evidenced by the led attached to pin 13), maybe two at most. To run anything that needs more power we need to use a pin to control another circuit and tell it to turn on and off, like a switch. In this way the circuit being controlled can have let’s say 100 LEDs or any other heavier load and its own way of powering it. Let’s take a practical example: We have some LED lights (let’s say 10) that run at 5V and has a maximum current draw of about 200mA. The LEDSs are in a small circuit and have their own resistors so they just need to be connected to a power source. To switch this circuit on and off we can have a switch on the + side (the one going from the + of the battery to the LEDs) or on the negative side. If we use a transistor as a switch this is called high-side switching and low-side switching.
Low-side switching
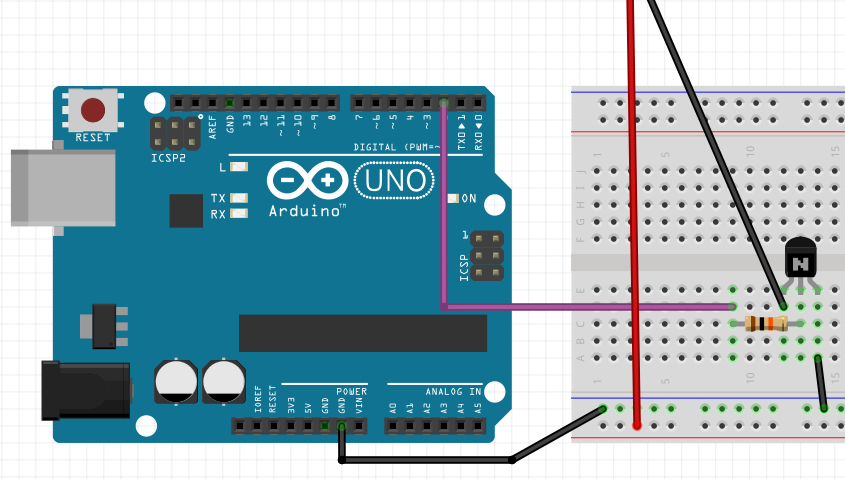
On the low side switching side you only need an NPN transistor. You control it through the resistor on its base and it connects its collector to the emitter that is tied to the ground. In this way it makes or brakes the path to the ground for the circuit that is being controlled.
High-side switching
Sadly because of physics we can’t control a circuit on the high-side as simply as on the low. For high-side switching you have to use two transistors: an NPN as before and a PNP that actually switches the circuit. The NPN is commanded from the Arduino through the base and a resistor. This one controls the PNP transistor through …you guessed it a resistor on the PNP’s base. I won’t go into the details of why this is, but I will attach links to some excellent online material on the subject.
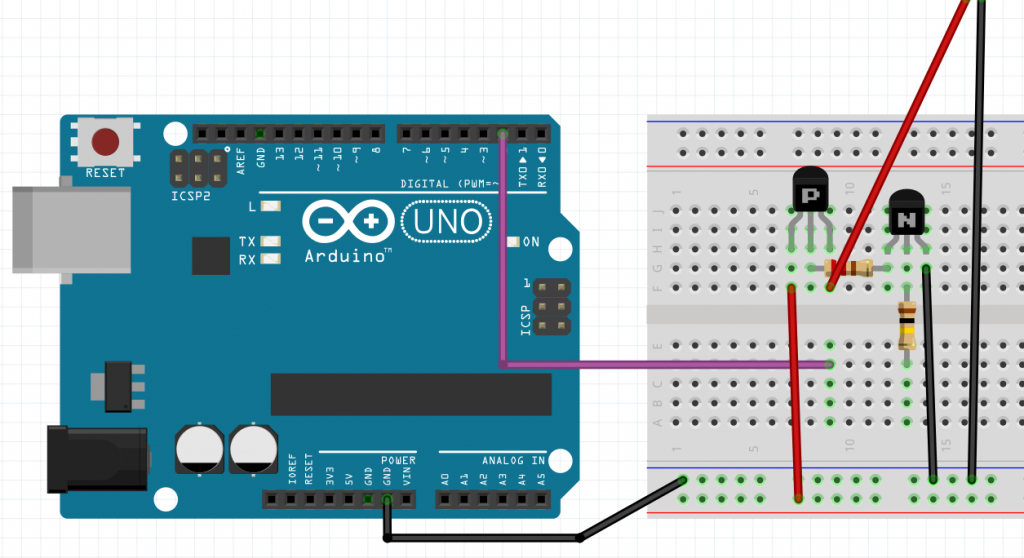
One thing to keep into mind is that the ground should be common between the controlled circuit and the controlling Arduino. That is why you see me taking the ground from the Arduino to the controlling breadboard. The positive value on the controlled circuit can be what value you want or need as long as it does not exceed the parameters of the transistor you are using. In regards to picking the correct transistors you have to first take into consideration the voltages that they are going to see on all their pins and pick transistors that can handle more that (usually much more). Then you will have to see the current that you are going to be passing through the transistor. In these circuits the key factor is the collector-emitter current on the transistor that is actually doing the switching. So, watch out for that otherwise be prepared for some impromptu fireworks. When I will use these arrangements, I will discuss the parts choice more in detail so you might want to look out for that.
In case you want to control something really powerful and you can’t find a transistor for that or one would be to expensive you can always use relays. Let’s say you have a lamp. You can have a relay between it and the plug on one of the wires. This relay could be controller by one of the circuits above: either high-side switching or low-side. Just remember that a relay uses an electro-magnetic coil to engage or disengage the main circuit and that coil requires enough current that it can’t be directly tied to an Arduino pin. (you really need that transistorized switching) To end on a high note you can find ready mare relay boards for general use. They take in the pins you want to control and power from the Arduino on one side and on the other they can interrupt a completely isolated circuit. So, go ahead, have fun and experiment.