Hello let’s talk a little about switches.
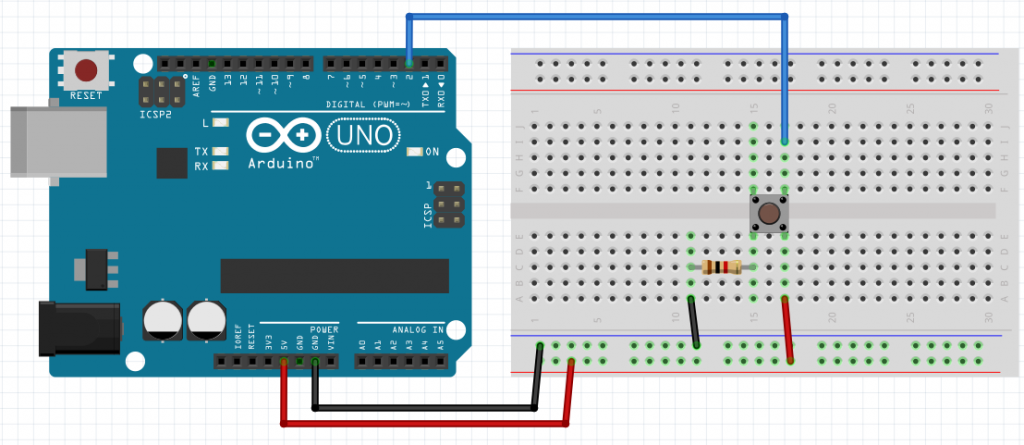
Switches in general are usually mechanical in nature. To be more precise they are two contacts which are shorted out by a mobile metal element. This metal element is pushed off the contact with a spring. Why am I going into all this detail regarding simple switches? Well let’s say you have a mechanical switch (a simple button) mounted in a circuit to a pin and with a pulldown resistor. Like this:
When I talked about inputs I said that to find out if a button is pressed all you have to do is read the data with digitalRead. Now let’s consider the following code:
//constants
const byte button = 2;

//variables
bool lastState=LOW;
bool buttonState=LOW;

void setup() {
 //inputs
 pinMode(button, INPUT);
 //output
 Serial.begin(9600);
}

void loop() {
 buttonState=digitalRead(button);
 if(buttonState == HIGH and lastState==LOW)Serial.println("A");
 lastState=buttonState;
}
It gets the button state and if the button state is pressed (aka HIGH) and the previous state was LOW it sends the character “A” to the serial port and we can see the character A in the SerialMonitor. All logic would dictate that if we upload the sketch and press the button once we would get the character A printed once. And upon testing this we find it to not be always true….We press the button and we are promptly greeted with one or more characters “A” printed. This is one of the moments that we see that the world is not painted in black and white but shades of grey. What is happening is that when we press the button the spring bounces and the contact is not perfect for a moment. This is known as bounce…as in the button is “bouncing”. If we were turning on the onboard led we would not notice anything, the electrical rolex replica watches noise is extremely fast. But the microcontroller is faster and it detects all those changes as new button presses. So if the button where controlling up or down in a menu we would sometimes see the menu going down more entries than wished. This is why we have to stop this phenomenon. Treating this situation is known as “debouncing”. An easy way to avoid this is to read the button press then read it again after a short delay and only act if the second time the button is still pressed. A much more correct way is how it’s done here:
/*
  Debounce

  Each time the input pin goes from LOW to HIGH (e.g. because of a push-button
  press), the output pin is toggled from LOW to HIGH or HIGH to LOW. There's a
  minimum delay between toggles to debounce the circuit (i.e. to ignore noise).

  The circuit:
  - LED attached from pin 13 to ground
  - pushbutton attached from pin 2 to +5V
  - 10 kilohm resistor attached from pin 2 to ground

  - Note: On most Arduino boards, there is already an LED on the board connected
    to pin 13, so you don't need any extra components for this example.

  created 21 Nov 2006
  by David A. Mellis
  modified 30 Aug 2011
  by Limor Fried
  modified 28 Dec 2012
  by Mike Walters
  modified 30 Aug 2016
  by Arturo Guadalupi

  This example code is in the public domain.

  http://www.arduino.cc/en/Tutorial/Debounce
*/

// constants won't change. They're used here to set pin numbers:
const int buttonPin = 2;    // the number of the pushbutton pin
const int ledPin = 13;      // the number of the LED pin

// Variables will change:
int ledState = HIGH;         // the current state of the output pin
int buttonState;             // the current reading from the input pin
int lastButtonState = LOW;   // the previous reading from the input pin

// the following variables are unsigned longs because the time, measured in
// milliseconds, will quickly become a bigger number than can be stored in an int.
unsigned long lastDebounceTime = 0;  // the last time the output pin was toggled
unsigned long debounceDelay = 50;    // the debounce time; increase if the output flickers

void setup() {
 pinMode(buttonPin, INPUT);
 pinMode(ledPin, OUTPUT);

 // set initial LED state
 digitalWrite(ledPin, ledState);
}

void loop() {
 // read the state of the switch into a local variable:
 int reading = digitalRead(buttonPin);

 // check to see if you just pressed the button
 // (i.e. the input went from LOW to HIGH), and you've waited long enough
 // since the last press to ignore any noise:

 // If the switch changed, due to noise or pressing:
 if (reading != lastButtonState) {
   // reset the debouncing timer
   lastDebounceTime = millis();
 }

 if ((millis() - lastDebounceTime) > debounceDelay) {
   // whatever the reading is at, it's been there for longer than the debounce
   // delay, so take it as the actual current state:

   // if the button state has changed:
   if (reading != buttonState) {
     buttonState = reading;

     // only toggle the LED if the new button state is HIGH
     if (buttonState == HIGH) {
       ledState = !ledState;
     }
   }
 }

 // set the LED:
 digitalWrite(ledPin, ledState);

 // save the reading. Next time through the loop, it'll be the lastButtonState:
 lastButtonState = reading;
}
This program is found in the examples of the Arduino IDE and full credit goes to the authors. The comments are self explanatory. The main thing to take away from this is that the program asks the pin assigned as input for its state. If it reads as different from what is the expected state the moment is saved. It then checks if enough time has passed since the last time the button was read as pressed and if it has it makes a boolean representing the button state change to the value it needs. Then according to this is does what it needs with that input. Seems a little complicated I know but this makes sure to debounce the input a produce nice clear inputs.